
Raw Edge Appliqué
- Kerry Keeble
- Aug 25, 2022
- 4 min read

The Aurifil Artisan Challenge for August was 'Appliqué' - any kind, any thread, any project. Excellent! I've had this idea for some kind of wall hanging for The She Shed floating around my head for quite some time, so I thought this would be a great opportunity to make it a reality.
I've done a little bit of needle turn appliqué in my quilting life and have also done things with trapunto and reverse appliqué as part of my degree, but I've never really done any raw edge appliqué. For the idea I had this was by far the best option, so I set about experimenting.

What is Raw Edge Appliqué?
Raw Edge Appliqué is a technique where the motifs to be appliquéd to the background fabric are cut to the exact size needed with the edges kept 'raw', meaning they are not turned under to the back. The edges can fray so if very neat, clean lines are your thing then this technique may not be for you. However there are lots of benefits for using this method:
- it's faster to prepare as the shapes are cut to the exact size
- it can create a more realistic look in art quilts particularly for tress, flowers, clouds and other elements in nature
- both hand and machine stitching can be used to create the look of a finished edge, edges can also be embellished to add dimension
- pieces can be held in place to the background fabric with glue, pins or fusible products such as bonda web.
The Inspiration
Many years ago I came across a quote that has always stuck with me,
"I created a world of my own, because you wouldn't let me in to yours"
It really resonated with me at the time and it still does now, it's partly why I fell into quilting (you can read about that here) and have since built a world of my own.

One of my favourite techniques is FPP (foundation paper piecing) and I've always loved magical things and fantasy worlds where anything is possible - put the two together and you get an epic Harry Potter alphabet pattern from Fandom Stitches, which is what I've used to create the words. I adapted the size of them slightly to fit my project and used my very favourite Pattern Trace paper - I don't get paid or freebies for recommendations, I just genuinely love this product, like with all my recommendations if it's not something I would use myself in my own work, it's not something I'd suggest to you.

I used this great water soluble pencil from Clover to mark out where everything was going to go and also used it to draw out my initial drawing of 'me' - I wish my eyebrows were that perfect!
Fun fact, when I was very young I fell and cut my head exactly where my right eyebrow is, I've got a scar that runs straight through it so the hair never grows there.
The drawn lines are my guide for free motion quilting - you can see the areas I've started and the areas I'm still working on, you can't see the other fun sections of FMQ yet because I'm still finalising the drawings for those.

The Fabric
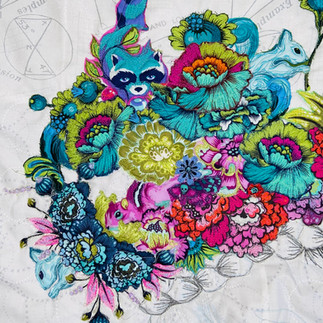
It's a well known fact that if you cut me open I would bleed Tula, so it was a no brainer that all of the things tumbling out of my head would be Tula creatures and creations. In my world there are unicorns and rainbows, mermaids and talking squirrels and chocolate that doesn't make you fat - want to join me??
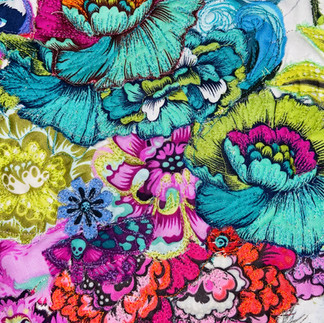
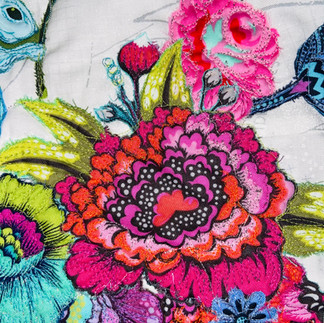
I've used pieces from a wide variety of Tula collections already - Elizabeth, Chipper, Birds and Bees, De La Luna, All Stars, Pinkerville and Curiouser and Curiouser, with plans to include a few more in other parts of the project before it's finished. I've chosen big florals as they create a great surface to work on with so many colours in them and then hidden various creatures among them, I love the subtlety of them poking out playing their own version of I-Spy like some kind of inside joke.

The Thread
This part was super fun! I laid out all the fabrics I wanted to use, got my Aurifil colour card out and started to make a list of colours that really made them pop. I knew I wanted the thread to blend in with the fabric and add a different dimension, but I didn't want it to get lost in it, so rather than pick exact matches I went for shades of those colours.
The colours used so far are all 50wt and include:
1104
1231
2588
1148
2770
5004
6726
2423
2135
2520
4093
The Project

I've absolutely LOVED designing and making this project, it's been so much fun pulling ideas out of my head and seeing them come to life in fabric and thread. The process of experimenting and trying new things, cutting up precious fabrics and actually using them in something I'll be able to look at every day in my studio has been quite liberating.
Below are some close ups of the details and hidden creatures, you'll see that the edges are not neat and the stitching isn't uniform - this is intentional, it's a representation of my wild and crazy thoughts that are anything but neat and uniform!
You can see the sections of my face and neck that still require stitching and adding more thread work to create shadows and shading which I'm really looking forward to working on further.


Have you ever tried raw edge appliqué? What are your top tips? Let me know in the comments, I'm really pleased with my first attempt but am always looking for ways to improve and develop my skills.
I really looking forward to sharing more of this project with you as it grows and gets completed, I'd love to know what you think so far!
Happy Quilting


Comments